Read More: Master your equipment with our detailed tutorials on using a food dehydrator and oven drying techniques
This article is a practical problem-solving guide for issues that arise during the home dehydration process. We focus on diagnosing problems and providing actionable solutions. Disclaimer: This guide provides food safety information. The most important rule is to prioritize safety; when you see any signs of mold or spoilage, the entire batch must be discarded.
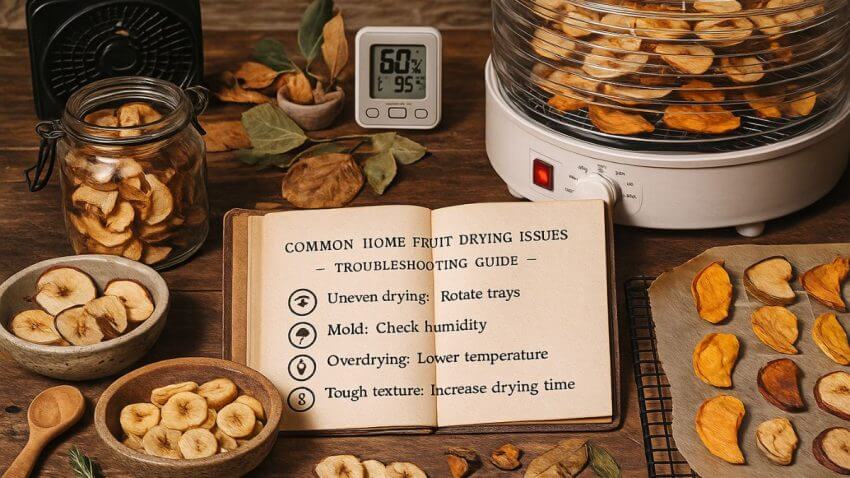
Key Takeaways
- Most Problems Trace Back to Three Factors: The vast majority of drying issues are caused by incorrect temperature (usually too high), poor air circulation, or uneven slicing of the fruit.
- Stickiness or Mold = Too Much Moisture: If your fruit is sticky, tacky, or develops mold after storage, it was not dried for long enough. The solution is more drying time and always performing the mandatory conditioning step—a 7 to 10 day process where dried fruit is stored in sealed jars to equalize residual moisture.
- Brittleness or a “Cooked” Taste = Too Much Heat: If your fruit is brittle instead of leathery, or tastes cooked, your oven or dehydrator temperature was set too high. This cooks the sugars rather than gently evaporating the water.
- Case Hardening (Hard Outside, Soft Inside): This specific issue is also caused by the temperature being too high at the beginning of the process, which sears the outside of the fruit and traps moisture inside.
- Browning is Natural (But Preventable): Fruits like apples and bananas turning brown is a natural process of oxidation. It is not a sign of spoilage, and it can be prevented with a simple pre-treatment like a lemon juice dip.
- The Golden Rule of Food Safety: When in doubt about whether a batch is spoiled, especially if you see mold, throw it out. It is never worth the risk.
Quick Troubleshooter Reference Table
This reference table provides immediate troubleshooting guidance for the most common fruit drying problems. Use it as your first diagnostic tool when something goes wrong with your batch.
| Symptom | Likely Cause | Immediate Fix | Prevent Next Time |
|---|---|---|---|
| Sticky/tacky after cooling | Under dried; high water activity | Return to 135–140°F (57–60°C) for 1–3 hours; then condition 7–10 days | Uniform 6 mm slices; tray spacing ≥ 1 cm; rotate trays |
| Hard outside, soft inside | Case hardening (temperature too high early) | Lower to 115–125°F (46–52°C) with maximum airflow for several hours | Start low (135°F), avoid “boosting,” verify oven temperature with thermometer |
| Brittle/cooked taste | Overheat or over dry | Reserve for chips/baking; next batch lower temperature | Begin checks 2 hours early; use timer reminders |
| Mold in jar | Residual moisture; skipped conditioning | Discard entire batch immediately | Condition every batch; never jar warm fruit |
| Brown/black color | Enzymatic browning (natural oxidation) | Safe to eat; cosmetic issue only | Lemon/ascorbic dip 5–10 minutes; minimize oxygen exposure |
Temperature and Time Guide by Fruit Type
Different fruits require specific temperatures, preparation methods, and drying times to achieve optimal results. This comprehensive guide provides exact parameters for the most commonly dried fruits at home. Understanding fruit-specific variables helps you calculate accurate dehydration yields and plan your drying batches effectively.
Standard Drying Parameters
Most fruits dry successfully at 135–140°F (57–60°C). This temperature range effectively removes moisture without cooking the natural sugars or destroying beneficial nutrients. Always slice fruit to uniform thickness for even drying.
| Fruit | Slice Thickness | Pretreatment | Temperature | Typical Time Range | Target Texture Test |
|---|---|---|---|---|---|
| Apples | 6 mm (1/4 inch) rings | Lemon/ascorbic dip recommended | 135–140°F (57–60°C) | 6–10 hours | Pliable, leathery; no moisture when pressed |
| Bananas | 6 mm slices | Optional lemon dip (1 Tbsp lemon + 1 cup water) | 135–140°F (57–60°C) | 6–12 hours (chips: 12–16 hours) | Chewy to crisp depending on preference |
| Apricots | Halves or quarters | Strong pretreatment recommended | 135–140°F (57–60°C) | 12–24 hours | Pliable with no moisture pockets |
| Mango | 6 mm slices | Freeze 30–40 minutes before slicing for easier handling | 135–140°F (57–60°C) | 8–14 hours | Leathery; watch for edge case-hardening |
| Pears | 6 mm (1/4 inch) rings | Lemon/ascorbic dip recommended | 135–140°F (57–60°C) | 10–16 hours | Pliable, slightly tacky surface acceptable |
| Blueberries | Whole | Blanch 15–30 seconds OR prick skins | 135–140°F (57–60°C) | 12–24 hours | Shriveled, leathery; no juice when squeezed |
| Grapes (Raisins) | Whole | Oil dip OR crack skins by blanching | 135–140°F (57–60°C) | 18–36 hours | Wrinkled, pliable; longer times are normal |
| Tomatoes | 6–8 mm slices or halves | Optional salt sprinkle; remove seeds | 135–140°F (57–60°C) | 8–14 hours | Leathery, pliable; darker color expected |
Important Note: These time ranges are estimates. Actual drying time varies based on fruit ripeness, ambient humidity, equipment efficiency, and slice uniformity. Always test for doneness rather than relying solely on time. For best results when working with multiple fruit types, explore our fruit comparison tool to understand moisture content differences.
Problem: Why is My Dried Fruit Still Moist, Sticky, or Unevenly Dried?
This is the most common issue faced by beginners. You follow the estimated time, but some pieces are perfectly dry while others remain soft, sticky, or moist in the center. Understanding the relationship between natural and artificial dehydration methods can help you identify which approach works best for your climate and equipment.
The Likely Causes
A food preservation expert would immediately suspect one of these issues:
- Inconsistent Slicing: This is the number one cause. If your fruit slices have varying thicknesses, the thin pieces will dry completely while the thick pieces retain moisture. Invest in a mandoline slicer to ensure every piece maintains uniform thickness of approximately 6 millimeters.
- Overcrowded Trays: If fruit pieces are touching or overlapping on the dehydrator trays, air cannot circulate properly around each piece, creating moist spots and dramatically increasing drying time. Maintain at least 1 centimeter spacing between pieces.
- Poor Air Circulation: If you are using an oven, failing to prop the door open will trap humid air inside, essentially steaming the fruit instead of drying it. This creates a high-humidity environment that prevents proper moisture evaporation.
- Insufficient Drying Time: Estimated times in recipes are just that—estimates. Factors like your home’s humidity and the specific water content of your fruit can mean you simply need more time than the recipe stated.
The Solutions and Preventative Measures
The Immediate Fix: If you test your fruit and it’s still moist, simply put it back in the dehydrator or oven for another 1 to 2 hours and check again. Never assume the recipe time is absolute—always test for doneness by touch and visual inspection.
The Prevention: Next time, focus on preparation. Use a mandoline slicer to ensure every piece is a uniform thickness. When placing fruit on the trays, leave a small amount of space around each piece to allow proper airflow. If using an oven, ensure the door is propped open 2 to 4 inches using a wooden spoon to allow moisture to escape continuously. For detailed instructions, see our guides on oven drying or using a dehydrator.
Weight Loss Method: Professional food preservers often use weight loss as a reliable indicator. Most fruits should lose approximately 80 to 90 percent of their original weight when properly dried. Weigh a sample batch before and after drying to verify you’re achieving adequate moisture removal.
Problem: Why Did My Fruit Turn Brown or Black?
You carefully sliced your beautiful apples or bananas, but after hours of drying, they have turned an unappealing dark brown or even black. This cosmetic issue is one of the most common concerns for first-time fruit dryers, though it doesn’t affect safety or nutritional value.
The Likely Cause
A food scientist would explain that this is a natural chemical reaction called enzymatic browning. When the fruit’s flesh is exposed to oxygen, an enzyme called polyphenol oxidase (PPO) causes phenols in the fruit to form a brown pigment. This is the same reaction that makes a cut apple turn brown on your counter. It is not a sign of spoilage and the fruit is perfectly safe to eat, but it can be visually unappealing.
The Solutions and Preventative Measures
This problem is solved before you start drying. As we detail in our comprehensive guide to pre-treatment methods for fruits before drying, you can prevent browning by dipping the fruit slices in an acidic solution. A simple and effective solution is a mix of one part lemon juice to four parts water. Soaking the slices for 5 to 10 minutes before dehydrating will inhibit the enzyme and help the fruit retain its natural color.
Alternative Pretreatment Options: Beyond lemon juice, you can use ascorbic acid powder (vitamin C) dissolved in water, or a commercial fruit preservative. For those concerned about sulfites, natural alternatives work effectively though may offer slightly less color retention. Understanding the difference between sulphured and unsulphured dry fruits helps you make informed pretreatment decisions.
Is it okay to eat dried fruit that has turned brown?
Yes. If the browning is from natural oxidation (like a cut apple turning brown), it is perfectly safe to eat, though the color may be less appealing. It is not a sign of spoilage or contamination.
Problem: Why is My Fruit Hard on the Outside but Soft Inside? (Case Hardening)
You test a piece of dried fruit and the exterior feels dry and leathery, but when you cut it open, the center is still moist and under-dried. This is a classic dehydration issue known as case hardening, and it’s one of the most frustrating problems because it’s not immediately visible from the outside.
The Likely Cause
Case hardening occurs when the initial drying temperature is too high. The intense heat effectively sears the outside of the fruit, creating a hard, impermeable crust. This crust then traps moisture deep inside the fruit, preventing it from evaporating. The outside feels “done,” but the inside remains moist, which can lead to mold during storage even if the fruit appears properly dried.
The Solutions and Preventative Measures
The solution is all about temperature control and equipment calibration.
- Use a Lower Temperature: Resist the temptation to speed up the process by cranking up the heat. Always use the recommended low temperature for your fruit (typically 135–140°F / 57–60°C). This allows moisture to escape gradually from the inside out.
- Verify Your Oven Temperature: If using an oven, use a separate oven thermometer to ensure your oven’s thermostat is accurate. Many ovens run 10 to 20 degrees Fahrenheit hotter than their settings indicate, which can cause immediate case hardening.
- Start Low, Stay Low: Never begin drying at a high temperature thinking you’ll reduce it later. The damage from case hardening happens in the first few hours of drying.
Case Hardening Recovery Protocol
If you have a batch with case hardening, you can attempt recovery by lowering the temperature to 115–125°F (46–52°C) and continuing to dry for several additional hours with maximum airflow. However, if the fruit shows no improvement after 4 to 6 hours of this treatment, the safest approach is to consume it soon, freeze it for short-term storage, or discard it—do not attempt long-term pantry storage as the trapped moisture will eventually support mold growth.
Problem: Why is My Dried Fruit Brittle or “Cooked” Instead of Chewy?
Instead of the pliable, leathery texture you wanted, your dried fruit snaps like a chip or has a caramelized, cooked flavor. While some people intentionally create fruit chips with this texture, it’s a problem when you were aiming for traditional dried fruit consistency.
The Likely Cause
This is the opposite side of the temperature coin: the heat was too high, or the fruit was left in for too long. At high temperatures, the sugars in the fruit don’t just concentrate; they begin to caramelize, and the structure of the fruit gets cooked. This results in a brittle, sometimes burnt product rather than a properly dehydrated one. The natural sugars undergo Maillard reactions, fundamentally changing the fruit’s texture and flavor profile. To better understand how drying affects nutritional content, review our analysis of nutrient density in dry fruits.
The Solutions and Preventative Measures
Again, this comes down to temperature and time management.
- Lower the Heat: Ensure your appliance is set to the correct low temperature for dehydration (135–140°F / 57–60°C), not baking temperatures. Even a difference of 20 degrees can push sugars into caramelization territory.
- Check for Doneness More Frequently: Start checking your fruit an hour or two before the recipe’s estimated completion time. Different batches of fruit have different moisture levels due to ripeness and variety, and yours may simply be done sooner than you expected.
- Set Multiple Timers: Use your phone or kitchen timer to check progress at regular intervals rather than waiting until the end of the estimated time.
- Altitude Considerations: At high altitude, evaporation occurs faster due to lower atmospheric pressure. Reduce your set temperature by approximately 5°F to prevent edge over-drying while the centers finish.
What texture should dried fruit have?
Most dried fruits, like apricots and raisins, should have a pliable, leathery texture when properly dried. They should bend without breaking and feel slightly tacky but not moist. Some fruits, like bananas and apples, can be intentionally dried longer until they become crisp like a chip if that’s your preference, but this requires careful monitoring to avoid burning.
Salvaging Over-Dried Fruit: If your fruit has become overly brittle but isn’t burnt, you can still use it effectively. Grind it into powder for smoothies, rehydrate it for baking applications, or simmer it briefly in a light syrup to restore some moisture for immediate consumption.
Problem: Why Did My Stored Homemade Dried Fruit Develop Mold?
This is the most serious food safety issue. You successfully dried a batch of fruit, stored it, and upon opening the jar weeks later, you find fuzzy spots of mold growing on the surface or between pieces. This indicates a fundamental problem with moisture content and represents a complete batch failure.
The Likely Cause
A food safety specialist from the NCHFP would state with certainty that mold growth after storage means one thing: the fruit was not dried sufficiently, and too much moisture remained. Even if the fruit felt dry to the touch, its internal water activity (aw) was high enough to support mold growth. This is almost always because the crucial post-drying conditioning step was skipped or done incorrectly. Proper storage practices, as outlined in our guide on shelf life for dry fruits, nuts, and seeds, are essential for long-term preservation.
The Solutions and Preventative Measures
Immediate Action: If you see any mold, discard the entire batch immediately. Do not try to salvage any of it. Mold produces microscopic roots (mycelium) that penetrate throughout the food, and some molds produce harmful mycotoxins that are not destroyed by heat. Even if only one piece shows visible mold, the entire batch is contaminated.
Prevention: The only way to prevent this is through proper drying and conditioning. You must test a cooled piece for doneness using the bend test and cut-and-press test, and then perform the 7 to 10 day conditioning process. Observing the sealed jar for condensation during this period is your final safety check that the fruit is truly dry enough for long-term storage.
Other Signs of Spoilage: Beyond visible mold, watch for these warning signs during conditioning or storage:
- Off-odors: Any fermented, yeasty, or unpleasant smell indicates microbial growth
- Tackiness after conditioning: Fruit should become less tacky during conditioning, not more
- Yeasty bubbles or foam: Signs of fermentation from residual sugars and moisture
- Visible moisture droplets: Water beading inside the storage container
If you observe any of these signs, discard the batch. There is no safe “rehabilitation” method for visibly spoiled fruit. Food safety always takes priority over the desire to save a batch.
Can you save moldy dried fruit?
No, absolutely not. If you see any mold on dried fruit, the entire batch should be discarded immediately as the mold can have invisible roots throughout the batch and may produce harmful mycotoxins that cannot be removed by any home treatment method.
The Conditioning Process: Step-by-Step Guide
Conditioning is the mandatory post-drying step that equalizes residual moisture throughout your dried fruit and serves as your final safety check before long-term storage. Many beginners skip this crucial step, leading directly to mold problems weeks or months later. Understanding fundamental fruit dehydration principles helps explain why conditioning is scientifically necessary.
Why Conditioning Matters
Even when fruit appears dry, individual pieces contain varying amounts of residual moisture. Some pieces may be slightly over-dried while others retain more water. Conditioning allows this moisture to redistribute evenly throughout the batch, ensuring consistent water activity levels and preventing localized mold growth in moister pieces.
Step-by-Step Conditioning Instructions
- Cool Completely: Allow all dried fruit to cool to room temperature on the drying trays. Warm fruit will create condensation inside jars, giving a false reading during conditioning.
- Pack Loosely: Place dried fruit in clean, dry glass jars, filling them only two-thirds full. This allows space for shaking and air circulation.
- Seal and Store: Cap jars tightly and store at room temperature in a location away from direct sunlight. Do not refrigerate during conditioning.
- Shake Daily: Once per day for 7 to 10 days, shake each jar vigorously to redistribute the pieces and expose different surfaces to the air inside.
- Monitor for Condensation: Each day when you shake, carefully inspect the jar walls and lid for any moisture droplets or fog.
- If Condensation Appears: This indicates excess moisture remains. Immediately return the entire batch to your dehydrator at 135°F (57°C) for 1 to 2 additional hours. Cool completely and restart the conditioning process from day one.
- Final Storage: When 7 to 10 days pass with absolutely no condensation appearing, the fruit is properly conditioned. Transfer to final storage containers and store in a cool, dark location.
Conditioning in Humid Climates
If you live in a high-humidity environment (relative humidity above 60 percent), conditioning becomes even more critical. Extend the conditioning period to a full 10 days and consider conditioning in an air-conditioned room to prevent ambient moisture from affecting your results. Watch jars more frequently—twice daily if possible—as humid air makes moisture issues more likely to develop.
Understanding Water Activity and Moisture Targets
Professional food preservation relies on the concept of water activity (aw), which measures the amount of free water available in food for microbial growth. While home food preservers don’t typically measure water activity with laboratory equipment, understanding this concept helps you achieve properly dried fruit.
Water Activity Explained
Water activity ranges from 0 (completely dry) to 1.0 (pure water). Most bacteria require aw above 0.90 to grow, yeasts need above 0.80, and molds can survive down to 0.70. For shelf-stable dried fruit without refrigeration, you must achieve aw ≤ 0.60. This level inhibits all microbial growth and allows safe storage at room temperature for months.
Home Proxy Tests for Moisture Content
Since most home kitchens lack scientific water activity meters, use these practical tests to verify proper dryness:
- The Bend Test
- Cool a piece of fruit completely. Bend it slowly. Properly dried fruit should be pliable and leathery, bending without breaking but showing no visible moisture when bent. If it snaps like a cracker, it may be over-dried (unless making chips). If it feels damp or moisture appears when bent, continue drying.
- The Cut-and-Press Test
- Cut a cooled piece in half and press firmly with your fingers. No moisture beads should appear. The interior should look uniformly dry without any visible wet spots or color variation that indicates moisture.
- The Weight Loss Method
- Weigh your fruit before drying and after. Most fruits should lose 80 to 90 percent of their original weight. For example, 1000 grams of fresh apples should yield approximately 100 to 200 grams of dried apples. Track these percentages for different fruits to develop reliable benchmarks. Our fruit dehydration yield calculator can help you predict expected weight loss for various fruits.
- The Tear Test
- Tear a piece of dried fruit in half. The tear should be relatively clean and even. If the fruit tears with stringy, moist fibers visible, it needs more drying time.
Why Conditioning Equalizes Moisture
During the conditioning period, any remaining moisture migrates from the center of fruit pieces toward the surface, then redistributes throughout the batch. This process lowers the overall water activity and creates uniform aw levels. If condensation appears during conditioning, it means some pieces retained too much internal moisture—the aw is still too high for safe storage, and additional drying is required.
Thermometer and Airflow Diagnostics
Many drying problems stem from equipment issues rather than technique errors. Your dehydrator or oven may not be operating at the temperature displayed, or airflow patterns may be inadequate for proper moisture removal. Conducting simple diagnostic tests helps identify these hidden problems before they ruin an entire batch.
Temperature Verification
Oven and dehydrator thermostats can drift over time, sometimes varying by 10 to 20°F (5 to 10°C) from the set temperature. This drift is enough to cause case hardening or prevent proper drying entirely.
How to Test Your Equipment Temperature
- Purchase an Oven Thermometer: Invest in a reliable standalone oven thermometer (available for under $10 at most kitchen stores). Place it on the center rack or dehydrator tray.
- Preheat and Wait: Set your equipment to 135°F (57°C) and allow it to run for 30 minutes to stabilize.
- Read and Compare: Check the thermometer reading. If it differs by more than 5°F (3°C) from your set temperature, you need to compensate in all future batches.
- Test Multiple Positions: For dehydrators, test temperature on the top, middle, and bottom trays. Many dehydrators show significant variation between trays, requiring rotation during drying.
- Adjust Your Settings: If your oven runs 15°F hot, set it to 120°F when you want 135°F actual temperature. Make a note and keep it visible for future reference.
Airflow Optimization
Proper air circulation is as critical as temperature control. Stagnant, humid air around fruit pieces prevents moisture evaporation regardless of heat levels.
Oven Airflow Guidelines
- Prop the Door: Always keep your oven door propped open 2 to 4 inches (5 to 10 cm) during fruit drying. Use a wooden spoon handle or rolled towel to maintain consistent spacing. This allows humid air to escape continuously rather than recirculating.
- Use Convection Setting: If your oven has a convection fan, use it. The moving air dramatically improves drying efficiency and reduces total time by 20 to 30 percent.
- Position Racks Properly: Use only the center rack positions, avoiding the very top and bottom where temperature extremes occur. Leave at least 3 inches of clearance above trays for air movement.
- Don’t Overload: Never use more than two racks at once in a standard oven. Overcrowding restricts airflow too severely for effective drying.
Dehydrator Airflow Best Practices
- Maintain Spacing: Leave at least 1 centimeter (0.4 inch) gap between fruit pieces on each tray. Pieces should never touch or overlap.
- Rotate Trays: Every 2 to 3 hours, rotate tray positions from top to bottom and bottom to top. Many dehydrators have hotter zones that dry fruit unevenly.
- Flip Pieces Mid-Process: For thick fruit pieces or halves (like apricots or peach halves), flip them over at the halfway point to ensure even drying on both sides.
- Check Fan Operation: Ensure your dehydrator’s fan runs continuously and sounds normal. A weak or failing fan dramatically extends drying time and creates uneven results.
- Clean Air Vents: Regularly clean all air intake and exhaust vents. Dust and debris buildup restricts airflow and reduces efficiency over time.
Quick Airflow Test
Hold a lightweight tissue paper near your oven opening or dehydrator vents while the unit runs. The paper should flutter noticeably from the moving air. If movement is minimal, airflow is insufficient for optimal drying. For ovens, widen the door gap; for dehydrators, check for fan problems or blocked vents.
Pretreatment Decision Chart
Deciding whether and how to pretreat fruit before drying can be confusing for beginners. Different fruits have different needs, and pretreatment methods serve various purposes—preventing browning, improving texture, reducing drying time, or enhancing safety. This section provides clear guidance on when and how to pretreat common fruits. For comprehensive details on all pretreatment methods, consult our complete guide to fruit pre-treatment before drying.
Pretreatment Methods Overview
Acidic Dips (Lemon Juice or Ascorbic Acid)
Purpose: Prevents enzymatic browning and preserves natural color.
Method: Mix 1 part lemon juice to 4 parts water, or dissolve 1 tablespoon ascorbic acid powder per quart of water. Soak fruit slices 5 to 10 minutes, drain, and pat dry before drying.
Best For: Apples, pears, bananas, peaches, apricots—any fruit that browns quickly when cut.
Sulfite Treatment
Purpose: Most effective color retention and extends shelf life by inhibiting oxidation and microbial growth.
Method: Dissolve sodium bisulfite or sodium metabisulfite according to package directions (typically 1 teaspoon per quart water). Soak fruit 5 to 10 minutes, drain without rinsing.
Warning: Sulfites can trigger severe allergic reactions in sensitive individuals, particularly those with asthma. Always label sulfite-treated dried fruits clearly. Many people prefer avoiding sulfites for health reasons. For more information, review our analysis of sulphured versus unsulphured dry fruits.
Best For: Commercial-quality color retention in apricots, peaches, and apples.
Blanching
Purpose: Cracks or softens tough skins on berries and small fruits, allowing internal moisture to escape more easily. Also deactivates enzymes.
Method: Immerse fruit in boiling water for 15 to 60 seconds (timing depends on fruit type), then immediately plunge into ice water to stop cooking. Drain and pat dry.
Best For: Blueberries, cranberries, grapes, small plums, and other fruits with waxy or tough skins.
Mechanical Skin Piercing
Purpose: Creates tiny holes in fruit skins to allow moisture escape without heat treatment.
Method: Use a sterilized needle, toothpick, or special fruit pricker to pierce each berry or grape several times.
Best For: Blueberries and grapes when you want to avoid blanching but need to crack the skin barrier.
Oil Dipping
Purpose: Traditional method for creating a microscopic coating that cracks waxy skin surfaces.
Method: Briefly dip grapes or small fruits in a solution of 1 teaspoon vegetable oil mixed into 1 quart boiling water, then rinse.
Best For: Grapes when making raisins, though blanching is often more reliable.
Fruit-Specific Pretreatment Recommendations
| Fruit | Pretreatment Required? | Recommended Method | Alternative Option |
|---|---|---|---|
| Apples | Highly recommended | Lemon juice or ascorbic acid dip | Sulfite dip for brightest color |
| Apricots | Highly recommended | Sulfite dip (if tolerated) or ascorbic acid | Lemon juice dip (expect darker color) |
| Bananas | Optional (cosmetic only) | Brief lemon juice dip (1 Tbsp per 1 cup water) | Skip if dark color acceptable |
| Blueberries | Required | Blanch 15–30 seconds OR pierce skins | Oil dip (less reliable) |
| Cherries | Optional | Pit and blanch 30 seconds if desired | Dry whole (much longer time) |
| Grapes | Required for faster drying | Blanch 30–60 seconds to crack skins | Oil dip or pierce skins |
| Mango | Optional | Light lemon dip prevents minor darkening | Skip—mango holds color fairly well |
| Peaches | Highly recommended | Ascorbic acid or lemon juice dip | Sulfite for commercial appearance |
| Pears | Highly recommended | Lemon juice or ascorbic acid dip | Sulfite dip for brightest color |
| Strawberries | Not necessary | None—strawberries hold color naturally | Light ascorbic dip if desired |
Important Note on Cinnamon: Sprinkling cinnamon or other spices on fruit before drying adds flavor but does not prevent browning. Only acidic or sulfite treatments inhibit the enzymatic browning reaction.
How Can You Troubleshoot Drying in a Humid Climate?
Drying fruit in a very humid environment—like a coastal region or during monsoon season in India—presents unique challenges because the surrounding air is already saturated with moisture. When relative humidity exceeds 60 percent, dehydration becomes significantly more difficult and requires special strategies to achieve safe results.
Why Humidity Affects Drying
Fruit drying works by creating a moisture gradient—water evaporates from the fruit surface into drier surrounding air. In humid conditions, the air can’t accept much additional moisture, dramatically slowing the evaporation rate. This creates three major problems: extended drying times, increased risk of microbial growth during the drying process, and difficulty achieving sufficiently low final moisture content for shelf stability. Understanding the broader environmental impact of dry fruit production includes recognizing how climate affects home preservation success rates.
Strategies for Humid Climate Drying
Equipment Choices
- Abandon Sun-Drying: Do not attempt to sun-dry fruit in a humid climate; it is a near-guarantee for mold growth before drying completes. An electric dehydrator is your only reliable option. Solar dehydrators can work if properly designed with forced ventilation, but passive sun-drying will fail in high humidity.
- Choose Higher-Wattage Dehydrators: More powerful heating elements help compensate for humid air. Look for dehydrators rated at least 600 to 1000 watts for better performance in challenging conditions.
- Horizontal Flow Dehydrators Preferred: Models with rear-mounted fans and horizontal airflow patterns provide more consistent results in humid conditions compared to vertical-flow stackable units.
Environmental Control
- Dry in Climate-Controlled Rooms: If possible, run your dehydrator in an air-conditioned or dehumidified room. This ensures the air being pulled into the machine is as dry as possible, which will significantly speed up the drying process and improve final results. Even reducing room humidity from 70 percent to 50 percent makes a noticeable difference.
- Use a Standalone Dehumidifier: If you don’t have air conditioning, consider running a portable dehumidifier in the same room as your dehydrator. Position it to draw moisture from the air without blowing directly onto the dehydrator exhaust.
- Choose Timing Strategically: If your region has seasonal humidity variation, schedule your fruit drying projects for the driest months. In many subtropical climates, winter months offer significantly lower humidity levels.
- Dry at Night: In some climates, nighttime humidity is lower than daytime. Running your dehydrator overnight may provide better conditions, though monitor temperature drift as nights cool.
Process Adjustments
- Expect Longer Drying Times: Be prepared for your drying times to be 25 to 50 percent longer than what recipes state. Factor this into your planning and energy cost calculations. What normally takes 8 hours might require 10 to 12 hours in humid conditions.
- Slice Thinner: Reduce your slice thickness slightly—from 6mm to 4 to 5mm—to compensate for slower moisture removal. Thinner slices complete drying before mold has opportunity to develop.
- Increase Tray Spacing: Leave more space between pieces than you would in dry climates—at least 1.5cm rather than 1cm—to maximize air contact with each piece.
- Check and Flip More Frequently: Inspect fruit every hour rather than every 2 to 3 hours. Flip pieces more often to ensure even drying and prevent moisture accumulation on down-facing surfaces.
- Start with Lower-Risk Fruits: Begin with fruits that dry relatively quickly and have natural antimicrobial properties—apples, pears, and citrus. Avoid high-moisture fruits like watermelon or very ripe mangoes until you’ve mastered technique in your climate.
Enhanced Conditioning Protocol
- Be Extra Vigilant with Conditioning: The post-drying conditioning step is even more critical in humid climates. Watch your jars very closely for any sign of condensation, checking twice daily rather than once daily.
- Extend Conditioning Period: Plan for 10 full days of conditioning rather than 7, giving moisture more time to redistribute and become visible if present.
- Condition in Dehumidified Space: If possible, keep conditioning jars in an air-conditioned room rather than in ambient humidity. This prevents atmospheric moisture from affecting your assessment.
- Consider Double-Drying: For highest-risk fruits, some experienced preservers in humid climates use a double-drying method: dry until seemingly complete, condition for 3 days, return to dehydrator for 1 to 2 additional hours, then condition again for 7 days.
Humidity Monitoring
Purchase an inexpensive hygrometer (humidity meter) to measure ambient and room humidity levels. This helps you understand your specific challenges and track whether environmental control measures are working. When room relative humidity drops below 50 percent, you’ll see dramatically improved drying performance.
Proper Storage Guidelines for Dried Fruits
Successfully drying fruit is only half the preservation process. Proper storage protects your investment of time and resources by maintaining quality, preventing rehydration, and ensuring food safety for months to come. Poor storage can undo hours of careful drying work within weeks. Our comprehensive shelf life guide for dry fruits, nuts, and seeds provides detailed information on maximizing storage duration for various products.
Container Selection
Best Container Options
- Glass Mason Jars with Two-Piece Lids
- The gold standard for home storage. Glass doesn’t absorb odors or flavors, allows visual inspection without opening, and two-piece lids create reliable seals. Use pint or quart sizes depending on your consumption rate. Amber or dark glass offers additional protection from light-induced nutrient degradation.
- Mylar Bags with Oxygen Absorbers
- Excellent for long-term storage (1+ years) and space efficiency. Mylar’s impermeability prevents moisture infiltration and oxygen exposure. Important: Only use oxygen absorbers with low-fat fruits like apples, pears, and apricots. Do not use with high-fat fruits like coconut or avocado, as removing oxygen accelerates fat rancidity. Learn more about different fat profiles in our guide to healthy fats in nuts and seeds.
- Food-Grade Plastic Containers with Gasket Seals
- Acceptable for short-term storage (up to 3 months) but not recommended for longer periods. Plastic is slightly permeable to air and moisture over time. If using plastic, choose containers specifically marked food-grade and BPA-free.
Containers to Avoid
- Plastic Bags: Regular zip-top bags are too permeable for dried fruit storage beyond a few weeks. They allow gradual moisture infiltration and don’t protect against pest infestation.
- Metal Containers Without Liners: Direct contact between dried fruit and metal can cause metallic off-flavors and accelerated oxidation, especially with acidic fruits.
- Reused Commercial Food Jars: Unless thoroughly cleaned and sanitized, these may retain residual odors and flavors that transfer to your dried fruit.
Optimal Storage Conditions
Temperature
Store dried fruits in a cool location at or below 70°F (21°C). Every 10°F increase in temperature roughly doubles the rate of quality deterioration. Ideal storage temperature is 50 to 60°F (10 to 15°C). Basements, interior closets, and pantries away from heat sources work well. Avoid storage near ovens, dishwashers, or sunny windows.
Light Exposure
Protect dried fruits from light, which accelerates vitamin degradation (especially vitamin C and beta-carotene) and causes color fading. Store containers in dark cabinets or use opaque containers. If using clear glass jars, keep them in closed cabinets or wrap in brown paper bags.
Humidity Control
Storage areas should maintain relative humidity below 60 percent. Higher humidity allows dried fruit to reabsorb moisture from the air even through sealed containers over extended periods. If your storage area is humid, consider adding silica gel packets to the storage space (not inside food containers) to reduce ambient moisture.
Fill Levels and Headspace
Fill storage containers to 80 to 90 percent capacity, leaving minimal headspace. Excess air inside containers allows more opportunity for oxidation. However, don’t pack so tightly that you crush delicate pieces. For vacuum-sealable bags, remove as much air as possible before sealing.
Expected Shelf Life by Fruit Type
| Fruit Type | Optimal Storage (Cool/Dark/Airtight) | Factors Affecting Longevity |
|---|---|---|
| High-sugar fruits (raisins, dates, figs) | 9–12 months | Sugar acts as natural preservative; longest shelf life |
| Standard fruits (apples, pears, apricots) | 6–9 months | Moderate sugar; good storage stability |
| High-acid fruits (pineapple, citrus) | 6–8 months | Acidity helps preserve but may affect container over time |
| Berries (blueberries, strawberries, cranberries) | 6–8 months | Smaller pieces = more surface area exposed to air |
| High-fat fruits (coconut, avocado) | 3–4 months (pantry); 8–12 months (freezer) | Fat content causes rancidity; refrigerate or freeze |
These ranges assume properly dried fruit (water activity ≤ 0.60) stored under optimal conditions. Quality slowly declines over time, but food safety remains intact if no moisture infiltration or contamination occurs.
Freezer Storage Option
For maximum longevity (18 to 24 months), store dried fruit in the freezer. Freezing halts all enzymatic and oxidative reactions. Package in freezer-grade containers or bags, remove air, and label with date. Frozen dried fruit maintains full flavor and nutritional quality. Thaw in the refrigerator or use directly from frozen in cooking applications.
Signs Your Stored Fruit Has Spoiled
Inspect stored dried fruit monthly for these warning signs:
- Visible Mold: Any fuzzy growth, white spots, or unusual discoloration—discard immediately
- Off-Odors: Fermented, musty, rancid, or otherwise unpleasant smells
- Unexpected Moisture: Fruit has become sticky or tacky when it was dry before
- Pest Infestation: Insects, webs, or larvae present—discard affected containers
- Rancid Taste: Especially in high-fat fruits; bitter or soapy off-flavors indicate oxidized fats
If you observe any of these signs, do not taste the fruit—discard the entire container immediately. When properly stored, dried fruit should maintain its original aroma, color, and texture throughout its shelf life with only gradual, natural darkening.
Per-Fruit Troubleshooting Notes
Each fruit presents unique challenges during home dehydration. Understanding fruit-specific issues helps you anticipate problems and adjust your technique accordingly. This section addresses common issues with popular fruits for drying.
Bananas
Common Issue: Excessive darkening during drying, even when pretreated.
Explanation: Bananas contain high levels of phenolic compounds and are extremely prone to enzymatic browning. Some darkening is inevitable and natural.
Solution: Pretreat slices in a solution of 1 tablespoon lemon juice per 1 cup water for 5 minutes before drying. Accept that some color change is normal—dark brown bananas are safe and delicious, just less visually appealing.
Texture Goals: Decide whether you want chewy banana pieces (dry 6 to 10 hours at 135°F) or crispy banana chips (12 to 16 hours). Chips require longer drying until they snap when bent.
Slicing Tip: Slice bananas slightly thicker (7 to 8mm) if making chewy pieces, as they shrink considerably and can become too brittle if sliced thinly.
Read More: Understand nutritional impacts through our analysis of nutrient density in dry fruits
Apples and Pears
Common Issue: Uneven drying with some rings remaining flexible while others become brittle.
Explanation: Inconsistent ring thickness causes varying drying rates. The core area is denser than outer areas.
Solution: Use a mandoline slicer or sharp knife to cut uniform 1/4 inch (6mm) rings. Remove cores completely or use an apple corer before slicing to ensure uniform thickness throughout each ring. Pretreat immediately after slicing with lemon juice or ascorbic acid to prevent browning.
Common Myth: Sprinkling cinnamon on apple slices prevents browning. This is false—cinnamon adds delicious flavor but doesn’t inhibit enzymatic browning. Only acidic pretreatments or sulfites prevent browning.
Variety Matters: Tarter apple varieties (Granny Smith, Braeburn) tend to retain better texture and color than very sweet or soft varieties (Red Delicious, McIntosh).
Mango
Common Issue: Slippery texture makes uniform slicing difficult; case hardening occurs frequently.
Explanation: Ripe mangoes have very soft, slippery flesh that’s hard to slice consistently. Their high sugar content makes them prone to case hardening if temperature is too high.
Solution: Freeze mango halves for 30 to 40 minutes before slicing—this firms the flesh and makes cutting much easier. Slice into 6mm strips. Watch temperature carefully and start at 135°F maximum, reducing to 130°F if case hardening begins. Rotate trays every 2 hours.
Texture Check: Properly dried mango should be leathery and pliable. Check for case hardening by cutting a test piece in half—the interior should look uniformly dry without darker, moist spots.
Berries (Blueberries, Cranberries)
Common Issue: Berries become tiny, hard pebbles instead of chewy dried fruit.
Explanation: Small berries have tough, waxy skins that trap moisture inside. Without breaking this barrier, moisture can’t escape, resulting in small, dense, hard pellets.
Solution: Pretreatment is mandatory for berries. Choose one method:
- Blanching (Recommended): Immerse berries in boiling water for 15 to 30 seconds until skins just begin to crack. Immediately plunge into ice water, drain, and pat dry.
- Mechanical Piercing: Use a sterilized needle or special berry pricker to pierce each berry 2 to 3 times. This is time-consuming but avoids heat exposure.
- Checking for Bloom: Some berries have a visible waxy coating (bloom). Gently rub under cool running water to remove this before drying—it impedes moisture release.
Drying Time: Even with pretreatment, expect 12 to 24 hours drying time for small berries. They’re done when shriveled, leathery, and no juice appears when squeezed firmly.
Grapes (Making Raisins)
Common Issue: Extremely long drying times (30+ hours) even at proper temperature.
Explanation: Grape skins are incredibly thick and waxy—they’ve evolved to resist moisture loss. Without treatment, drying takes days.
Solution: Pretreatment is essential. Two effective methods:
- Blanching: Dip grapes in boiling water for 30 to 60 seconds until skins begin to crack. Cool immediately in ice water. This is the most reliable method.
- Oil Dip: Traditional method involves briefly dipping in boiling water containing 1 teaspoon vegetable oil per quart, then rinsing. Less reliable than blanching.
Expectation Setting: Even with pretreatment, grapes require 18 to 36 hours of drying. Longer times are completely normal for this fruit. Plan accordingly and don’t assume something is wrong if they’re not done quickly. Understanding natural sugar content in dry fruits helps explain why high-sugar fruits like grapes take longer to dry.
Strawberries
Common Issue: Halves or slices turn very dark and lose their bright red color.
Explanation: Unlike apples, strawberry darkening is not enzymatic browning but rather concentration of natural pigments and some oxidation of vitamin C.
Solution: Strawberries naturally darken during drying—this is expected. No pretreatment significantly prevents it. Slice uniformly (6mm thick), remove caps, and accept darker final color. Properly dried strawberries retain excellent flavor despite color change.
Texture Goal: Strawberries should be leathery and pliable with no moisture when pressed, typically requiring 8 to 14 hours at 135°F.
Peaches and Apricots
Common Issue: Severe browning makes fruit unappealing; uneven drying in thicker halves or quarters.
Explanation: Stone fruits are highly susceptible to enzymatic browning and have variable thickness in halves.
Solution: Strong acid pretreatment is essential—ascorbic acid solution works better than plain lemon juice for these fruits. For more uniform drying, slice halves into quarters or smaller wedges rather than drying as large halves. Check thickness carefully at the thickest point (near where the pit was) and adjust slicing to keep all pieces similar.
Preventing Toughness: Don’t over-dry stone fruits. They should remain pliable and slightly soft to the touch. Overdried apricots become tough and lose their appealing chewiness.
Frequently Asked Questions on Troubleshooting Fruit Drying
Why are my dried berries tiny and hard like pebbles?
Small berries like blueberries have a tough, waxy skin that traps moisture inside. If not pre-treated by blanching briefly to crack the skin or piercing with a pin, they dry very slowly and end up as tiny, hard pellets. Pretreatment is absolutely key for successful berry drying—blanch for 15 to 30 seconds in boiling water until skins just crack, then immediately cool in ice water before drying.
My fruit seems dry but is still flexible. Is it done?
Yes, that is the target texture for most fruits like apricots, peaches, and pears. You are aiming for a pliable, leathery texture, not something completely brittle. The fruit should bend without breaking and show no moisture when pressed or cut. Only certain fruits like banana chips or apple chips are intentionally dried until crisp and brittle. Flexible and leathery indicates proper drying for most applications.
Can I speed up drying by increasing the temperature?
No, this is the most common and costly mistake. Increasing the temperature will cook the outside of the fruit, creating a hard crust known as case hardening that traps moisture inside and leads to a poor-quality, potentially unsafe product. The proper drying temperature of 135–140°F (57–60°C) allows moisture to evaporate gradually from the inside out. Patience is essential for safe, high-quality dried fruit.
Why is it important to use parchment paper and not wax paper in an oven?
Wax paper is coated with a thin layer of paraffin wax, which will melt at oven temperatures. This creates smoke, unpleasant odors, and causes the paper to stick to your fruit and baking sheets, ruining your batch. Parchment paper is coated with silicone and is heat-resistant up to 425°F (218°C), making it safe and effective for fruit drying. Always verify you’re using parchment, not wax paper, before beginning.
Can I dry different fruits together in my dehydrator?
It is best to dry only one type of fruit at a time. Different fruits have different moisture contents and will dry at different rates, making it impossible to know when each type is properly done. Additionally, strong-flavored fruits like pineapple or mango can impart their aroma to milder fruits like apples during the long drying cycle. If you must mix fruits, only combine those with similar moisture content and drying times, and be prepared to remove trays individually as each fruit finishes.
How do I know if my dried fruit has too much moisture for safe storage?
Perform the conditioning test after drying. Place cooled fruit in sealed jars for 7 to 10 days, shaking daily. If any condensation appears on the jar walls or lid, the fruit retains too much moisture and must be returned to the dehydrator for additional drying. Additionally, cut a piece in half and press firmly—no moisture beads should appear. If you’re uncertain about moisture levels, use our hydration impact calculator to better understand water content in different fruits.
What should I do if I over-dried my fruit and it’s too brittle?
Over-dried fruit is safe to eat and can be repurposed effectively. You can rehydrate it for use in baking by soaking in warm water, juice, or wine for 15 to 30 minutes. Alternatively, grind brittle fruit into powder using a food processor or blender—this powder works excellently in smoothies, yogurt, or as a natural sweetener in baked goods. You can also simmer over-dried fruit briefly in a light sugar syrup to restore some moisture for immediate consumption.
How long can I safely store home-dried fruit?
Properly dried fruit stored in airtight containers in a cool, dark location lasts 6 to 12 months. High-sugar fruits like raisins and dates last longest (9 to 12 months), while high-fat fruits like coconut have shorter shelf life (3 to 4 months at room temperature, longer if refrigerated or frozen). Freezer storage extends shelf life to 18 to 24 months for all fruits. Always inspect monthly for signs of moisture, mold, or pest infestation. For detailed storage timelines, consult our shelf life estimator tool.
Is it safe to dry fruit in direct sunlight?
Sun-drying is only safe in specific conditions: hot, dry climates with temperatures consistently above 85°F (29°C), relative humidity below 60 percent, and low insect activity. Even then, fruit must be covered with cheesecloth to protect from insects and brought indoors at night. In humid climates or areas with frequent clouds, sun-drying is unsafe as fruit won’t dry quickly enough to prevent microbial growth. Electric dehydrators provide much more reliable and food-safe results for most home preservers. Learn more about different approaches in our guide comparing natural versus artificial fruit dehydration methods.
Why did only some pieces of my batch develop mold while others seem fine?
When any pieces show mold, the entire batch must be discarded. Visible mold on some pieces indicates that those pieces retained higher moisture content, but the invisible mold spores have likely spread throughout the container, contaminating all pieces. Mold produces microscopic roots (mycelium) that penetrate food invisibly, and some molds create harmful mycotoxins. Never try to salvage a partially moldy batch—food safety requires discarding everything from that container.
Can I test my oven’s temperature accuracy without a thermometer?
Not reliably. While some people suggest using the browning rate of white bread or sugar as temperature indicators, these methods are imprecise and unreliable for the narrow temperature ranges needed for fruit drying. An oven thermometer costs under $10 and is essential for successful dehydration. Oven thermostats commonly drift by 10 to 20°F over time, which is enough to cause case hardening or inadequate drying. Invest in a simple oven thermometer for best results.
Do I need to blanch fruit before drying?
Blanching is required only for specific fruits with tough or waxy skins—primarily berries and grapes. For most fruits like apples, pears, peaches, and mangoes, blanching is unnecessary and can actually damage texture. However, blueberries, cranberries, and grapes must be blanched or mechanically pierced to crack their protective skin barrier and allow internal moisture to escape. Without this pretreatment, these fruits will take excessively long to dry and often result in hard, pellet-like pieces.
What’s the difference between leathery and brittle texture in dried fruit?
Leathery texture is the goal for most dried fruits. This means the fruit is pliable and bends without breaking, similar to the texture of commercial raisins or dried apricots. It should feel dry to the touch but remain flexible. Brittle texture means the fruit snaps or breaks when bent, like a cracker or chip. Brittleness indicates over-drying or excessive heat. Some fruits like banana chips and apple chips are intentionally dried to brittleness, but for most applications, leathery is correct.
Should I peel fruit before drying?
Peeling is optional and depends on personal preference and fruit type. Thin-skinned fruits like apples, pears, and peaches can be dried with skins on—this adds fiber and nutrients, though skins become slightly tougher during drying. Thick-skinned fruits like mangoes, pineapples, and citrus must be peeled as their skins are inedible. Some people prefer peeling all fruit for more uniform texture and appearance. If keeping skins on, wash fruit thoroughly before slicing to remove any pesticide residues or wax coatings.
Why does my dried fruit taste different from store-bought?
Commercial dried fruit often contains added ingredients and undergoes different processing than home-dried fruit. Many commercial products include added sugars, sulfites for color preservation, and vegetable oils for shine and anti-sticking. They may also be dried at precisely controlled temperatures in specialized equipment. Home-dried fruit has a more authentic, concentrated fruit flavor without additives. If your home-dried fruit tastes “cooked,” your temperature was likely too high. Understanding how to read dry fruit labels helps you identify what’s actually in commercial products.
Can I rehydrate dried fruit, and how?
Yes, dried fruit rehydrates easily for cooking and baking applications. Place dried fruit in a bowl and cover with hot (not boiling) water, juice, wine, or other liquid. Let soak for 15 to 30 minutes until fruit absorbs liquid and softens. Drain excess liquid before using. For faster rehydration, simmer dried fruit gently in liquid for 5 to 10 minutes. Rehydrated fruit works excellently in pies, compotes, oatmeal, and baked goods. For precise rehydration calculations, try our rehydration calculator.
Is it normal for dried fruit to have a slightly sticky surface?
A very slight tackiness on high-sugar fruits like raisins, dates, and figs is normal and acceptable. These fruits have such concentrated sugars that their surface feels slightly tacky even when properly dried. However, if the fruit feels wet, leaves moisture on your fingers, or develops obvious sticky spots after storage, it was under-dried and needs additional dehydration time. Learn to distinguish between the natural slight tackiness of sugar concentration versus problematic moisture retention through experience and the conditioning process.
How we reviewed this article:
▼This article was reviewed for accuracy and updated to reflect the latest scientific findings. Our content is periodically revised to ensure it remains a reliable, evidence-based resource.
- Current Version 06/10/2025Written By Team DFDEdited By Deepak YadavFact Checked By Himani (Institute for Integrative Nutrition(IIN), NY)Copy Edited By Copy Editors
Our mission is to demystify the complex world of nutritional science. We are dedicated to providing clear, objective, and evidence-based information on dry fruits and healthy living, grounded in rigorous research. We believe that by empowering our readers with trustworthy knowledge, we can help them build healthier, more informed lifestyles.