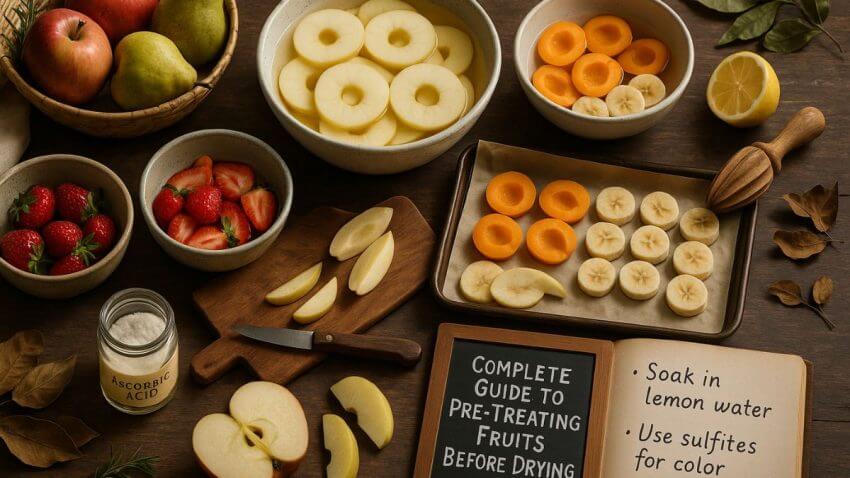
One of the great joys of home food preservation is creating dried fruits that are not only delicious but also beautiful. If you’ve ever wondered how commercial dried apricots retain their vibrant orange hue while your homemade ones turn brown, the secret lies in a step that happens before the drying even begins: pre-treatment.
Defining Our Food Preservation Focus
This article is a detailed how-to guide on the methods used to treat fruit prior to dehydration. The focus is on safety, effectiveness, and proper technique. CRITICAL DISCLAIMER: This guide discusses various chemical and heat-based methods. Always follow safety instructions precisely. The section on sulphuring details a process with significant health risks and should only be considered by experienced individuals who can adhere strictly to official safety protocols. For beginners, safer alternatives are strongly recommended.
Key Scientific Principles and Safety Guidelines
- Why Pre-Treat?: The primary reason to pre-treat fruits like apples, pears, and apricots is to inactivate enzymes that cause rapid browning upon exposure to air, thus preserving the fruit’s natural color and flavor.
- Safest and Easiest Method: For most home preservers, the safest, easiest, and most recommended pre-treatment is an ascorbic acid (Vitamin C) dip. It is highly effective at preventing browning without significantly altering flavor.
- Lemon Juice Alternative: A simple dip in a solution of lemon juice and water is another effective, accessible, and safe method for preventing oxidation and browning.
- pH Control: Most effective pre-treatments work by lowering the fruit surface pH below 4.0, where polyphenol oxidase enzyme activity decreases significantly.
- Temperature Considerations: Heat-based blanching methods work best at 180-212°F (82-100°C) for 30-90 seconds to preserve nutrients while achieving desired texture.
- Sulphuring Hazards: While highly effective for color and nutrient preservation, home sulphuring with sulfur dioxide (SO₂) is a hazardous process that produces toxic fumes and can trigger severe reactions in sensitive individuals. It is not recommended for beginners and must be done outdoors with extreme caution, strictly following NCHFP guidelines.
- Blanching for Texture: Methods like syrup or steam blanching are used for specific fruits to set their color and soften their texture before drying, but can result in some nutrient loss.
Why Should You Pre-Treat Fruits Before Drying? The Science of Preservation
Pre-treatment is a preventative step designed to combat the natural degradation process that begins the moment a fruit is cut open. A food scientist would explain that the primary goal is to control the effects of enzymes and oxygen.
Inactivating Browning Enzymes
The main culprit behind a sliced apple or pear turning brown is an enzyme called polyphenol oxidase (PPO). However, other enzymes like peroxidase also contribute to color degradation and off-flavor development during fruit processing.
- Mechanism: When you cut the fruit, you rupture the cells, allowing PPO to mix with phenolic compounds and oxygen. This triggers a rapid chemical reaction that produces brown pigments (melanin).
- Impact: This enzymatic browning not only affects the appearance but can also lead to off-flavors and a loss of some nutrients.
- pH Threshold: PPO activity decreases significantly when fruit surface pH drops below 4.0, which explains why acidic pre-treatments are so effective.
- Temperature Sensitivity: These enzymes are heat-sensitive and can be permanently inactivated at temperatures above 140°F (60°C), forming the basis for blanching methods.
Most pre-treatments aim to stop the PPO enzyme from causing browning and off-flavors once the fruit is cut.
Other Benefits of Pre-Treatment
Beyond preventing browning, pre-treating can:
- Preserve Vitamins: Ascorbic acid dips help preserve heat-sensitive vitamins such as A and C by preventing oxidation during drying. Studies show that properly pre-treated fruits retain up to 80% more Vitamin C compared to untreated fruits.
- Soften Tough Skins: For fruits like grapes or plums, a brief blanching can crack the waxy skin, which significantly reduces drying time by allowing moisture to escape more easily.
- Discourage Spoilage Microbes: Some treatments, especially sulphuring, have an antimicrobial effect that helps to prevent the growth of bacteria and mold during drying.
- Enhance Texture: Proper pre-treatment can prevent the formation of tough, leathery textures by controlling how cellular structure changes during dehydration.
- Improve Rehydration: Pre-treated fruits often rehydrate more evenly and completely when used in cooking applications.
For a deeper understanding of these processes, see our guide on Natural vs. Artificial Fruit Dehydration Methods. To calculate how much fresh fruit you’ll need for your desired dried fruit quantity, use our Fruit Dehydration Yield Calculator.
What Are the Safest and Easiest Pre-Treatment Methods for Home Use?
For the vast majority of home food preservers, acidic dips are the safest, easiest, and most effective way to prevent browning and preserve the quality of your fruit.
Method 1: Ascorbic Acid (Vitamin C) Dips
- What It Is: Ascorbic acid is pure Vitamin C, available as a powder or in crushed tablet form from pharmacies or baking supply stores.
- How It Works: As a powerful antioxidant, it directly counteracts the oxidation process, preventing the browning reaction from occurring without significantly altering the fruit’s flavor. It works by donating electrons to neutralize free radicals before they can react with fruit phenolics.
- Step-by-Step Instructions:
- Mix 1 teaspoon of pure ascorbic acid powder (or 3000mg of crushed Vitamin C tablets) into 2 cups (about 500ml) of cold water.
- Stir thoroughly until completely dissolved – undissolved crystals can cause uneven treatment.
- Place your freshly cut fruit slices into the solution immediately after cutting.
- Soak for 3-5 minutes – longer soaking doesn’t improve effectiveness but may affect texture.
- Remove the fruit with a slotted spoon, drain well on clean towels, and arrange on your dehydrator trays.
- Use solution within 2 hours for maximum effectiveness.
- Pros and Cons: Highly effective, adds a small nutritional boost of Vitamin C, and has no discernible flavor. It is the method most recommended by food preservation experts. The only drawback is that ascorbic acid powder is not something everyone has on hand and requires purchasing from specialty stores.
Method 2: Lemon Juice or Citric Acid Dips
- What It Is: A simple solution using readily available lemon juice or citric acid powder.
- How It Works: The high acidity of the solution lowers the pH on the fruit’s surface, which inhibits the activity of the browning enzyme PPO. Lemon juice contains natural ascorbic acid (about 50mg per 100ml), which helps prevent enzymatic browning.
- Step-by-Step Instructions:
- Mix equal parts fresh lemon juice and cold water (e.g., 1 cup juice to 1 cup water). For citric acid, use 1 teaspoon per quart (about 1 liter) of water.
- Use freshly squeezed lemon juice, as bottled versions may contain preservatives that alter the taste of dried fruit.
- Soak the fruit slices for 3-5 minutes, turning pieces once for even coverage.
- Remove, drain well on paper towels, and place on dehydrator trays.
- Fresh solution should be prepared for each batch to maintain acidity levels.
- Pros and Cons: Very accessible and effective, works immediately upon contact. The main drawback is that it can impart a noticeable lemony flavor to the dried fruit, which may or may not be desirable. Some people find this adds a pleasant tartness, while others prefer neutral-tasting methods.
Comprehensive Pre-Treatment Method Analysis
Water-Based Methods
Salt Water Solution Method
This traditional method uses the osmotic properties of salt to draw moisture from fruit surfaces while creating an inhospitable environment for browning enzymes.
Steps:
- Dissolve 2 tablespoons of non-iodized salt in 1 gallon of cold water.
- Submerge fruit pieces for 5-10 minutes.
- Rinse thoroughly with clean water to remove excess salt.
- Drain completely before drying.
Pros and Cons: Inexpensive and readily available. However, it can make fruit slightly salty and is less effective than acid-based methods for color preservation. Best used for fruits that will be seasoned or used in savory applications.
pH-Balanced Solutions
Acidic solutions inhibit browning enzymes, while slightly alkaline solutions may affect fruit texture—knowing this helps you choose the right pre-treatment method. Acidic solutions (pH 2.0-4.0) work by enzyme inhibition, while slightly alkaline solutions (pH 8.0-9.0) can help with certain texture modifications but may accelerate browning.
Heat-Based Methods Comparison
Steam Blanching vs. Hot Water Blanching
Steam Blanching: Exposes fruit to steam at 212°F (100°C) for 30-90 seconds. This method preserves more water-soluble vitamins since nutrients aren’t leached into water. Ideal for delicate fruits like peaches or pears.
Hot Water Blanching: Submerges fruit in boiling water for 15-60 seconds. More aggressive than steam blanching and better for fruits with tough skins like grapes or plums. However, it causes more nutrient loss.
Optimal Temperature Ranges: For nutrient retention while achieving desired texture changes, maintain blanching temperatures between 180-200°F (82-93°C) rather than full boiling temperatures.
Chemical-Based Alternatives
Citric Acid Method (Detailed)
Pure citric acid offers more consistent results than lemon juice since its acidity level is standardized.
Steps:
- Dissolve 1 teaspoon food-grade citric acid in 1 quart cold water.
- Test pH with strips – aim for 2.5-3.0 pH.
- Soak fruit for 3-5 minutes.
- No rinsing required – drain and proceed to drying.
Benefits: More predictable than lemon juice, longer shelf life of solution, neutral flavor impact. Drawbacks: Requires purchasing food-grade citric acid, may cause slight texture softening in delicate fruits.
Safer Commercial Alternatives to Sulfur Dioxide
Modern food science has developed safer alternatives to traditional sulphuring:
- Sodium Bisulfite Solutions: Offer a safer alternative to burning sulfur but must still be handled with care and avoided by those sensitive to sulfites.
- Mixed Antioxidant Solutions: Some commercial antioxidant blends include ascorbic acid, citric acid, and natural extracts such as rosemary or green tea for enhanced browning protection.
- Vacuum Treatment: Removing oxygen during pre-treatment can significantly slow browning without chemical additives.
Natural and Organic Methods
Honey or Sugar Dips
Natural sweeteners can provide preservation benefits while enhancing flavor.
Honey Dip Method:
- Mix 1/4 cup honey with 1 cup warm water until dissolved.
- Add 1 tablespoon lemon juice for additional browning prevention.
- Soak fruit for 5-10 minutes.
- Drain thoroughly – excess honey will create sticky dried fruit.
Pros: Adds natural sweetness, some antimicrobial properties from honey, completely natural. Cons: Significantly increases sugar content, may attract insects during drying, can create uneven drying due to high sugar concentration.
Light Oil or Spice Coatings
Very light coating of neutral oils or spice mixtures can provide flavor enhancement and minor preservation benefits.
Method: Lightly brush fruit with food-grade mineral oil or toss with small amounts of cinnamon, which has natural antimicrobial properties. Use sparingly – excess oil prevents proper dehydration.
Comparison to Chemical Methods: Natural methods are generally safer and add interesting flavors, but they’re less effective for color preservation and may require longer drying times. They work best when combined with other preservation methods rather than used alone.
When Should You Use Blanching as a Pre-Treatment?
Blanching—briefly heating the fruit in steam or a syrup—is used for specific purposes, such as softening a tough skin or helping the fruit retain its color during drying.
Steam or Water Blanching
This method involves briefly scalding the fruit. A food preservation expert from a university extension would recommend this for certain fruits to “check” or crack the skin, which allows moisture to escape more easily and speeds up drying time. It’s often recommended for grapes, plums, and cherries.
Detailed Process:
- Bring water to a rolling boil in a large pot with a steamer basket.
- Place fruit in a single layer in the steamer basket.
- Cover and steam for 30-60 seconds until the skin cracks – timing varies by fruit size and ripeness.
- Immediately submerge in ice water to stop the cooking process.
- Drain thoroughly and pat dry before arranging on drying trays.
Temperature Control: Maintain steam temperature between 200-212°F (93-100°C). Lower temperatures won’t effectively crack skins, while overheating creates mushy texture.
Syrup Blanching
In this method, fruit is simmered briefly in a sugar syrup. This process is sometimes used for fruits like apples or pears to help them retain more color and give them a sweeter, almost candied texture. It adds a significant amount of sugar and is less common for simple home drying.
Light Syrup Method:
- Combine 1 cup sugar with 3 cups water and bring to a simmer.
- Add fruit pieces and simmer for 2-3 minutes.
- Remove fruit and drain on wire racks.
- Allow to cool completely before drying.
This method works particularly well for apples intended for dessert applications, as it creates a more tender, sweet final product similar to commercial dried apple rings.
Essential Equipment and Tools for Home Pre-Treatment
Basic Equipment Needed
Successful pre-treatment requires proper tools to ensure safety, efficiency, and consistent results.
Essential Tools
- Non-reactive bowls: Glass, stainless steel, or food-grade plastic bowls for acid solutions – avoid aluminum which can react with acids.
- Accurate measuring tools: Graduated measuring cups and spoons for precise solution preparation.
- Timer: Digital timer for consistent soaking and blanching times.
- Slotted spoons or mesh strainers: For safely removing fruit from solutions.
- Clean kitchen towels: Use several clean, lint-free kitchen towels to absorb excess moisture from fruit slices after pre-treatment.
- pH test strips: To verify acid solution strength when precision is important.
Heat-Based Method Equipment
- Large pot with tight-fitting lid: For steam blanching operations.
- Steamer basket or insert: Elevates fruit above water level during steaming.
- Instant-read thermometer: To monitor water and steam temperatures accurately.
- Large bowl with ice water: For immediate cooling after blanching – stops cooking process.
- Blanching basket: Wire mesh basket for easy fruit handling during hot water blanching.
Cost-Effective and DIY Alternatives
Budget-Friendly Options
For beginners or those on tight budgets, several household items can substitute for specialized equipment:
- Large mixing bowls: Any non-reactive large bowl can serve as a treatment vessel.
- Colander improvisation: A large colander can function as a steamer basket when placed in a pot.
- Clean dishcloths: Can substitute for specialized draining towels.
- Smartphone timer: Digital timers are built into most phones.
- Ice cube trays: For making large quantities of ice for cooling baths.
DIY Steamer Setup
Create an effective steaming system using common kitchen items:
- Place a heat-proof plate or small bowl upside-down in a large pot.
- Add water to just below the plate level.
- Place a second plate right-side up on top of the first – this becomes your fruit platform.
- Cover tightly and bring to a boil for effective steaming.
Cleanliness and Sterility
Equipment Sanitation
Proper sanitation prevents contamination that could spoil your preserved fruit:
- Wash all equipment: Use hot, soapy water before each use.
- Sanitizing solution: Rinse with a solution of 1 tablespoon bleach per gallon of water, then air dry.
- Avoid cross-contamination: Use separate utensils for different treatment solutions.
- Dry completely: Moisture on equipment can dilute treatment solutions and harbor bacteria.
- Storage: Store clean equipment in sealed containers or clean towels between uses.
Fruit-Specific Pre-Treatment Recommendations
Different fruits require different pre-treatment approaches based on their natural characteristics, enzyme activity levels, and intended final texture.
Detailed Fruit-by-Fruit Guide
- Apples and Pears
- Recommended method: Ascorbic acid dip or lemon juice solution
Reasoning: High PPO enzyme activity makes these fruits extremely prone to browning. Acidic treatments are most effective.
Special considerations: Remove cores and slice uniformly. Softer varieties may need shorter soaking times to prevent texture degradation.
- Grapes and Small Stone Fruits (Plums, Cherries)
- Recommended method: Steam blanching for 30-60 seconds
Reasoning: Waxy skin prevents moisture loss during drying. “Checking” (cracking) the skin dramatically reduces drying time.
Special considerations: Remove pits from stone fruits. Grapes can be left whole after blanching.
- Citrus Fruits
- Recommended method: Minimal or no pre-treatment needed
Reasoning: Natural acidity inhibits browning enzymes. High citric acid content provides built-in preservation.
Special considerations: Remove as much white pith as possible – it becomes bitter when dried. Uniform slicing is crucial for even drying.
- Berries (Blueberries, Cranberries, Strawberries)
- Recommended method: Usually no pre-treatment required
Reasoning: Low PPO activity and natural acids provide adequate browning protection. Thin skins allow adequate moisture escape.
Special considerations: Large strawberries should be sliced. Whole small berries can be lightly pricked to speed drying if desired.
- Tropical Fruits (Pineapple, Mango, Papaya)
- Recommended method: Light lemon juice dip or ascorbic acid treatment
Reasoning: Moderate browning tendency. Natural enzymes (like bromelain in pineapple) can affect texture during drying.
Special considerations: Remove all skin and cores. Cut into uniform pieces for consistent drying.
- Bananas
- Recommended method: Ascorbic acid or lemon juice dip
Reasoning: Extremely high browning enzyme activity. Without treatment, they turn nearly black during drying.
Special considerations: Use slightly underripe bananas for better texture. Slice consistently and work quickly to minimize air exposure.
Batch Size Considerations
Small Batch Processing (1-2 pounds of fruit)
- Use standard solution ratios as listed in methods above.
- Process fruit immediately after cutting to minimize browning before treatment.
- Single bowl systems work efficiently for small quantities.
- Treatment solutions remain effective for entire small batch.
Large Batch Processing (5+ pounds of fruit)
- Prepare multiple treatment stations to handle larger volumes.
- Scale up solution quantities proportionally – don’t reuse diluted solutions.
- Work in smaller sub-batches to maintain solution effectiveness.
- Consider having helpers to speed the cutting and treatment process.
- Refresh treatment solutions every 2 hours or when they become cloudy.
Pre-Treatment Compatibility with Different Drying Methods
The choice of pre-treatment method can significantly impact the effectiveness and safety of different fruit drying techniques. Understanding these interactions helps optimize your final results.
Electric Dehydrator Compatibility
Electric dehydrators provide controlled temperature and airflow, making them compatible with all pre-treatment methods. For detailed guidance on using dehydrators effectively, see our comprehensive guide on How to Use a Food Dehydrator for Drying Fruits at Home.
- Acidic treatments: Work excellently with dehydrator drying. Controlled temperature prevents acid degradation.
- Blanched fruits: Benefit from dehydrator’s consistent airflow for even moisture removal.
- Sugar-treated fruits: Dehydrator’s precise temperature control prevents caramelization issues.
- Timing impact: Pre-treated fruits often dry 20-30% faster in dehydrators due to improved moisture movement.
Oven Drying Considerations
Oven drying presents unique challenges that affect pre-treatment choice. Our detailed guide on How to Dehydrate Fruits in Oven at Home provides comprehensive safety and technique information.
- Temperature sensitivity: Oven heat can be less consistent, making acid-treated fruits safer from over-browning.
- Moisture management: Blanched fruits may release too much steam in closed oven environments.
- Sugar considerations: Sugar-treated fruits risk caramelizing in oven hot spots – monitor carefully.
- Safety factors: Pre-treatment becomes more critical in ovens due to temperature variations.
Sun Drying and Natural Methods
Traditional sun drying methods require the most robust pre-treatment due to uncontrolled environmental factors.
- Enhanced protection needed: Stronger acid solutions or combination treatments work best.
- Weather dependency: Pre-treatment must account for humidity and temperature variations.
- Extended exposure time: Longer drying periods make thorough pre-treatment essential.
- Contamination risk: Antimicrobial pre-treatments become more important outdoors.
Freeze-Drying Compatibility
Freeze-drying’s unique process affects how pre-treatments perform.
- Minimal browning risk: Low oxygen environment reduces need for extensive browning prevention.
- Texture preservation: Blanching pre-treatments may be counterproductive as they can create mushiness.
- Acid treatments: Still beneficial for color preservation and flavor enhancement.
- Chemical treatments: Most effective since freeze-drying preserves treatment compounds.
What is Sulphuring? (An Advanced Method Requiring Extreme Caution)
Sulphuring is the process of exposing fruit to sulfur dioxide (SO₂) gas before drying. It is a highly effective commercial method for preserving color and nutrients, but it is a hazardous process that is NOT recommended for beginners or for use indoors.
The Science: How Sulfur Dioxide Works
A food scientist would explain that SO₂ is a potent inhibitor of the PPO enzyme, completely preventing browning. It is also an excellent antioxidant, protecting Vitamins A and C from degradation during drying. This is why commercially sulphured apricots are bright orange and retain more of these vitamins than unsulphured ones. For more detailed information on the differences, see our guide on Sulphured vs. Unsulphured Dry Fruits.
CRITICAL SAFETY WARNINGS
The following warnings are based on food safety authority guidelines and must be strictly observed:
- TOXIC FUMES: The process involves burning sulfur, which releases sulfur dioxide gas. These fumes are toxic if inhaled and can cause severe respiratory irritation. The process MUST be done outdoors in a well-ventilated area, away from children and pets.
- SULPHITE SENSITIVITY: The residual sulphites on the fruit can trigger severe, asthma-like reactions in sensitive individuals. According to FDA estimates, approximately 1% of the population is sulfite-sensitive, with higher rates among asthmatics.
- NOT FOR BEGINNERS: Due to these risks, this method should only be attempted by experienced food preservers who can strictly follow established safety protocols.
- Legal Considerations: Some municipalities have restrictions on burning sulfur due to air quality regulations.
The Process (As per NCHFP Guidelines)
For educational purposes only, the process described by the National Center for Home Food Preservation (NCHFP) involves placing prepared fruit on stacked trays inside a large cardboard box with vents. A small container of food-grade subliming sulfur is placed in the bottom and ignited. The box is then covered for a specific duration (2-4 hours, depending on the fruit) to allow the fumes to permeate the fruit before it is removed for drying.
Note: This description is provided for educational understanding only. We strongly recommend safer alternatives for home food preservation.
How Do the Different Pre-Treatment Methods Compare?
Choosing a pre-treatment method involves a trade-off between effectiveness, safety, convenience, and impact on flavor.
| Method | Effectiveness on Color | Impact on Flavor | Safety & Ease of Use | Cost | Nutrient Retention |
|---|---|---|---|---|---|
| Ascorbic Acid Dip | Excellent | None | Very Safe & Easy | Moderate | Excellent |
| Lemon Juice Dip | Very Good | Can add noticeable lemon flavor | Very Safe & Easy | Low | Good |
| Citric Acid Dip | Very Good | Minimal | Very Safe & Easy | Low-Moderate | Good |
| Steam Blanching | Good (sets color) | Slight cooked flavor | Safe, requires equipment | Low | Fair |
| Salt Water Dip | Fair | Can add saltiness | Safe & Easy | Very Low | Fair |
| Honey Dip | Fair | Adds sweetness | Safe & Easy | Moderate-High | Good |
| Sulphuring | Excellent | Slight chemical taste | Hazardous | Low | Excellent |
Best Practices and Common Mistake Prevention
Choosing the Right Method
Selection criteria should consider multiple factors to optimize results:
Based on Fruit Type
- High-enzyme fruits (apples, pears, bananas): Use ascorbic acid or strong lemon juice solutions.
- Thick-skinned fruits (grapes, plums): Blanching is often necessary regardless of browning concerns.
- Naturally acidic fruits (citrus, cranberries): Minimal or no pre-treatment needed.
- Delicate fruits (berries, soft stone fruits): Gentle acid dips only – avoid heat treatments.
Based on Available Tools
- Basic kitchen equipment only: Lemon juice or salt water methods work well.
- Access to specialty ingredients: Ascorbic acid provides optimal results.
- Steaming capability: Blanching becomes viable for appropriate fruits.
- Limited time: Simple acid dips are fastest and most efficient.
Based on Desired Final Product
- Natural flavor preservation: Ascorbic acid or minimal treatment approaches.
- Enhanced flavors welcome: Honey, spice, or citrus-based treatments.
- Maximum shelf stability: Stronger acid treatments or combination approaches.
- Professional appearance: To achieve a professional appearance, use consistent pre-treatment techniques that prevent discoloration and uneven texture during drying.
Importance of Quality Starting Material
Clean, Fully Ripe Fruit Selection
- Optimal ripeness: Use fruit at peak ripeness for best flavor and texture. Underripe fruit won’t develop proper sweetness during drying, while overripe fruit may become mushy.
- Damage inspection: Remove any bruised, soft, or damaged portions before treatment – these areas concentrate bacteria and enzymes.
- Uniform sizing: Cut pieces to similar thickness (typically 1/4 to 1/2 inch) for even drying.
- Cleanliness protocol: Wash all fruit thoroughly before cutting, even if you plan to peel it.
Common Mistakes and Prevention
Over-Soaking (Texture Loss)
Problem: Extended soaking times can cause fruit to absorb too much water and become mushy.
Prevention: Strictly adhere to recommended soaking times (3-5 minutes for most methods). Set a timer and don’t exceed recommended durations.
Solution if it occurs: Pat fruit extra dry and extend initial drying time slightly to compensate for increased moisture.
Over-Blanching (Mushy Fruit)
Problem: Excessive heat exposure breaks down cellular structure, creating unappetizing texture.
Prevention: Use precise timing (30-60 seconds maximum for most fruits) and immediate ice water cooling.
Solution if it occurs: Over-blanched fruit can still be used for purees, fruit leather, or cooking applications rather than dried fruit snacks.
Using Too Strong Solutions (Flavor Change)
Problem: Overly concentrated acid or salt solutions can overwhelm natural fruit flavors.
Prevention: Measure ingredients precisely and follow established ratios. Test on small batches first.
Solution if it occurs: Rinse treated fruit briefly with clean water to remove excess solution, then pat dry before drying.
Cross-Contamination Issues
Problem: Using contaminated equipment or solutions can introduce bacteria or off-flavors.
Prevention: Clean all equipment thoroughly, use fresh solutions for each batch, and avoid mixing different treatment types in the same session.
Troubleshooting Common Pre-Treatment Issues
Preventing and Addressing Mold or Spoilage
Prevention Strategies
- Proper drainage: Ensure all excess solution is removed before drying – pooled moisture encourages microbial growth.
- pH monitoring: Maintain solution acidity levels throughout treatment session.
- Temperature control: Keep pre-treatment solutions cool (below 70°F/21°C) to slow bacterial growth.
- Time limits: Complete the entire process from cutting to drying start within 2 hours.
- Clean workspace: Sanitize all surfaces and tools before beginning treatment.
Addressing Spoilage Signs
Early detection: Look for off-odors, slimy texture, or discoloration during treatment.
Immediate action: Discard affected pieces immediately – don’t attempt to salvage compromised fruit.
Solution refresh: Prepare fresh treatment solutions and re-sanitize all equipment when contamination is suspected to prevent spoilage and bacterial growth.
Fixing Texture Issues
Too Chewy Results
Causes: Insufficient pre-treatment, uneven piece sizes, or inadequate drying.
Solutions:
- Ensure complete treatment coverage – all surfaces should contact solution.
- Cut pieces more uniformly for consistent moisture removal.
- Consider combination pre-treatment (light blanching followed by acid dip).
- Extend drying time to achieve proper moisture content (typically 15-20%).
Too Brittle Results
Causes: Over-treatment, excessive heat during pre-treatment, or over-drying.
Solutions:
- Reduce treatment time or concentration for future batches.
- Monitor blanching temperatures more carefully.
- Test dried fruit moisture content – properly dried fruit should be pliable, not crisp.
- Consider rehydrating slightly if brittleness is excessive.
Climate-Specific Adjustments
High-Humidity Environments
Challenges: Slower drying times, increased mold risk, reduced treatment solution effectiveness.
Adjustments:
- Use slightly stronger acid solutions to compensate for dilution effects.
- Ensure exceptional drainage before beginning drying process.
- Consider using dehumidifiers in drying area.
- Monitor progress more frequently for signs of spoilage.
- May need to extend overall drying times significantly.
Very Dry Climates
Challenges: Rapid surface drying can trap moisture inside, uneven drying patterns.
Adjustments:
- Slightly longer pre-treatment times may help with moisture distribution.
- Consider higher humidity drying environment initially, then finishing in dry conditions.
- Monitor for case hardening (hard exterior, moist interior).
- May be able to use lighter pre-treatments due to reduced spoilage risk.
Safety Precautions for Pre-Treated Fruit
Handling Guidelines
- Personal protection: Wear gloves when handling acidic solutions to prevent skin irritation.
- Ventilation: Ensure adequate ventilation when using any chemical treatments.
- Storage of solutions: Dispose of used treatment solutions properly – don’t reuse for food purposes.
- Labeling: Mark containers clearly if storing any prepared solutions temporarily.
Emergency Procedures
- Skin contact with strong acids: Flush immediately with cool water for at least 15 minutes.
- Accidental ingestion: Drink water to dilute, contact poison control if large amounts consumed.
- Respiratory irritation: Move to fresh air immediately, seek medical attention if symptoms persist.
Frequently Asked Questions about Pre-treating Fruits
What is the absolute easiest way to keep dried apples from turning brown?
The easiest and safest method is to dip fresh apple slices in a simple solution of equal parts lemon juice and water for 3-5 minutes before drying. This accessible method requires no special ingredients and effectively prevents browning while adding only a subtle citrus note to the final product.
Do I need to pre-treat all fruits?
No, pre-treatment is only necessary for fruits prone to rapid browning or those with tough skins. Fruits that are not prone to rapid browning, such as most berries, figs, dates, and citrus fruits, generally do not require any pre-treatment. However, pre-treating can still provide benefits like enhanced color retention and improved shelf life even for naturally stable fruits.
Can I use orange juice instead of lemon juice for a dip?
Yes, orange juice can work as an alternative, though it’s less effective than lemon juice. Orange juice contains citric acid and some Vitamin C, but in lower concentrations than lemon juice. It will provide some browning protection and impart a milder, sweeter citrus flavor. For best results, use fresh orange juice and consider a slightly longer soaking time.
What is “checking” in relation to drying grapes?
“Checking” refers to creating fine cracks in grape skins through brief blanching to allow moisture escape during drying. This process is necessary because grape skins have a natural waxy coating that prevents moisture loss. The fruit is briefly exposed to steam or boiling water for 30-60 seconds until small cracks appear, then immediately cooled in ice water.
Do I need to peel fruit before drying?
Peeling is not necessary for most fruits and can actually reduce nutritional value and natural preservation compounds. Exceptions include fruits with very thick or bitter peels, such as citrus (remove outer peel but leave some white pith for pectin), or fruits with waxy coatings that prevent proper drying. Apple and pear peels contain valuable nutrients and help maintain fruit structure during drying.
How long can pre-treated fruit sit before drying?
Pre-treated fruit should begin the drying process within 2 hours for optimal safety and quality. While acid treatments provide some antimicrobial protection, the moist environment and cellular damage from cutting create conditions where bacteria can multiply. If delays are unavoidable, refrigerate pre-treated fruit and use within 24 hours maximum.
Does pre-treatment change the taste of dried fruit?
Most pre-treatments have minimal impact on final flavor when used properly. Ascorbic acid treatments are virtually flavorless. Lemon juice adds a subtle tartness that many people enjoy. Blanching can create a slightly softer, more “cooked” flavor. Salt treatments may add slight saltiness. The key is using proper concentrations and timing – over-treatment is usually where flavor issues arise.
Which method keeps the most vitamins?
Ascorbic acid dips provide the best vitamin retention, particularly for Vitamins A and C. This method actually adds Vitamin C while preventing oxidation that destroys heat-sensitive nutrients. Cold acid treatments preserve more vitamins than heat-based methods like blanching, which can cause some water-soluble vitamin loss.
Can you mix methods (e.g., blanch then acid dip)?
Yes, combination methods can be very effective for specific applications. For example, grapes might be blanched first to crack the skin, then dipped in lemon juice for additional browning protection. However, this increases processing time and complexity. Ensure the first treatment doesn’t interfere with the second – for instance, blanching followed immediately by an ice bath, then acid dipping.
Why was sulphuring so common historically?
Sulphuring became widespread in early industrial food production because it was inexpensive and highly effective for large-scale operations. A food historian would note that it guaranteed uniform color and extended shelf life for mass-market products during long, slow drying processes before modern controlled-environment drying equipment became available. It was particularly valuable for maintaining product consistency across seasonal variations in fruit quality.
Are there any fruits that shouldn’t be pre-treated?
Very delicate berries like raspberries or blackberries may be damaged by most pre-treatment methods. Their cell walls are fragile and can break down with acid soaking or heat treatment. Additionally, fruits that are naturally high in acid or have natural preservation compounds (like cranberries) rarely benefit from additional pre-treatment and may suffer texture degradation.
What should I do if my pre-treated fruit develops an off smell?
Discard the fruit immediately – off odors during pre-treatment indicate bacterial contamination. This can occur if equipment wasn’t properly sanitized, solutions were contaminated, or fruit sat too long before drying. Never attempt to salvage fruit showing signs of spoilage, as this poses serious food safety risks.
How we reviewed this article:
▼This article was reviewed for accuracy and updated to reflect the latest scientific findings. Our content is periodically revised to ensure it remains a reliable, evidence-based resource.
- Current Version 13/08/2025Written By Team DFDEdited By Deepak YadavFact Checked By Himani (Institute for Integrative Nutrition(IIN), NY)Copy Edited By Copy Editors
Our mission is to demystify the complex world of nutritional science. We are dedicated to providing clear, objective, and evidence-based information on dry fruits and healthy living, grounded in rigorous research. We believe that by empowering our readers with trustworthy knowledge, we can help them build healthier, more informed lifestyles.