
This article is a detailed “how-to” guide focused specifically on using an electric food dehydrator. We will cover the principles, processes, and safety considerations.
Disclaimer: The information provided is based on established food preservation guidelines. Always prioritize safety and proper food handling. The drying times provided are estimates and can vary significantly based on your specific dehydrator model, fruit type, and ambient humidity.
Key Takeaways
- Why Use a Dehydrator?
- A food dehydrator is superior to an oven because its integrated fan provides constant, gentle airflow at a low, controlled temperature. This combination efficiently removes moisture without cooking the fruit, resulting in better texture, color, and nutrient retention.
- Uniformity is Essential
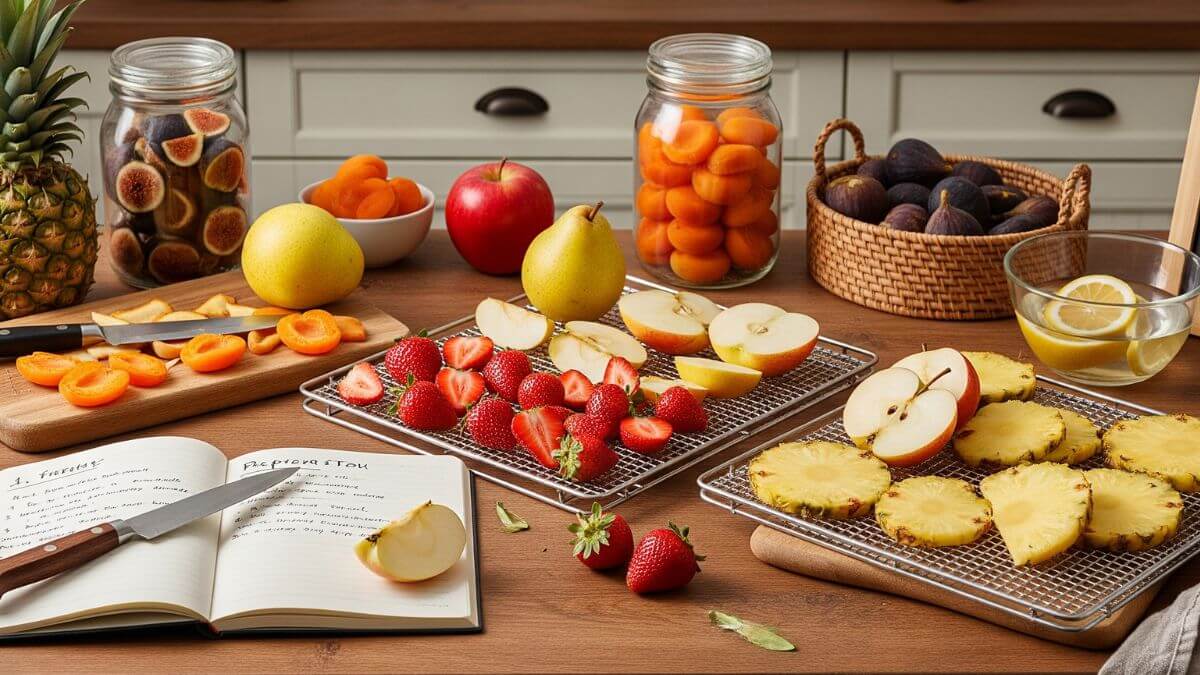
- The most critical step for even drying is to slice all your fruit to a uniform thickness, typically 1/4-inch to 1/2-inch (~6-12mm).
- Temperature Matters
- The standard temperature for drying most fruits is 135-140°F (57-60°C). Using a lower temperature will take longer but may preserve more heat-sensitive nutrients.
- Don’t Overlap on Trays
- Arrange fruit pieces in a single layer on the dehydrator trays, ensuring they do not touch or overlap. This allows air to circulate freely around every piece.
- “Conditioning” is a Mandatory Final Step
- After drying, you must “condition” the fruit by storing it in a sealed jar for 7-10 days and shaking it daily. This equalizes moisture and ensures the fruit is safe from mold for long-term storage.
- Patience is Key
- Dehydrating is a slow process, often taking 6-12 hours or more. Do not be tempted to increase the temperature to speed it up, as this will cook the outside of the fruit while leaving the inside moist.
Why Use a Food Dehydrator for Drying Fruits?
A food dehydrator is a specialized appliance engineered for one purpose: to remove water from food efficiently and safely. Its design offers key benefits over oven or sun-drying, such as steady airflow, controlled temperatures, and greater consistency.
A food preservation expert would highlight these key benefits:
- Superior Airflow
- The integrated fan is the most important feature. It constantly circulates dry, warm air across all the trays, effectively wicking moisture away from the fruit’s surface. This is far more efficient than the static heat of a conventional oven.
- Consistent, Low Temperature
- Dehydrators are designed to operate at low, stable temperatures (e.g., 95-155°F or 35-68°C). This allows you to dehydrate food without cooking it, which is crucial for preserving texture and heat-sensitive nutrients.
- Energy Efficiency
- A dehydrator’s low-wattage heating element and small fan use significantly less energy over their long run time compared to keeping a large kitchen oven on for 8-12 hours.
- Quality and Consistency
- The controlled environment produces a much more uniform and high-quality final product than the variable conditions of sun-drying or the uneven heat of an oven.
What Do You Need to Get Started? Equipment and Fruit Selection
Beyond the dehydrator itself, you only need a few basic kitchen tools to begin making your own delicious dried fruits.
Essential Equipment and Tools
- A Food Dehydrator: Models come in two main styles: stackable (with a fan at the bottom or top) or box-and-tray (with a fan at the back, which often provides more even airflow).
- A Sharp Knife or Mandoline Slicer: A mandoline is highly recommended for creating perfectly uniform slices, which is the key to even drying.
- Cutting Board & Large Bowl.
- Airtight Containers: For storing your finished product. Glass jars with tight seals are ideal.
Choosing the Best Fruits for Dehydrating
The best fruits are those that are ripe, flavorful, and firm, but not overly mushy. It’s an efficient way to preserve extra seasonal fruit. Great options for beginners include:
- Apples, Pears, Bananas
- Peaches, Apricots, Plums
- Strawberries, Blueberries, Cherries
- Pineapple, Mangoes
How Do You Prepare Fresh Fruits for the Dehydrator?
To prepare fruit for dehydrating, wash it thoroughly and slice it evenly to ensure uniform drying. This step requires the most active preparation.
Step 1: Washing and Slicing for Uniformity
First, wash all fruit thoroughly under cool, running water. Then, prepare it for slicing. Since you’ll be removing a significant amount of water, you can estimate your final output with our Fruit Dehydration Yield Calculator.
- Slicing is Key: All pieces must be a uniform thickness. This is the most important rule for success. A mandoline slicer is the best tool for this. Aim for a thickness of about 1/4-inch (~6mm) for most fruits.
- Small Fruits: Small berries like blueberries can be left whole (though poking a small hole in their skin helps them dry). Strawberries should be sliced, and cherries should be pitted and halved.
Step 2: The Role of Pre-Treatment (Optional)
Fruits like apples and bananas will turn brown (oxidize) when cut. While this is harmless, you can prevent it by dipping the slices in an acidic solution for 5-10 minutes. A simple and effective solution is a mix of one part lemon juice to four parts water. This optional pre-treatment step helps prevent browning, making the dried fruit more visually appealing—especially important for apples and bananas.
What is the Step-by-Step Process for Using Your Dehydrator?
The drying process begins after preparation. Here’s how to set up and operate your dehydrator step by step. The process is simple, requiring you to set the machine correctly and have patience.
Step 1: Arranging Fruit on the Trays
Place the prepared fruit slices in a single layer on the dehydrator trays. It is essential that the pieces do not touch or overlap. This allows for optimal air circulation around every piece, which is critical for even drying.
Step 2: Setting the Correct Temperature
Set your dehydrator to the recommended temperature for fruits. According to the NCHFP, the standard temperature for most fruits is 135°F to 140°F (57°C to 60°C). This temperature is low enough to prevent cooking but warm enough to dehydrate the food safely and efficiently.
Step 3: Understanding Drying Times and Tray Rotation
Drying time depends on the type of fruit, slice thickness, and the performance of your dehydrator. It can take anywhere from 6 to 16 hours or more.
- Check the Manual: Your dehydrator’s manual will have a chart with estimated drying times. Use this as a starting guide.
- Rotate Trays: For stackable dehydrator models, the trays closest to the fan/heat source will dry faster. It’s important to rotate the trays (moving bottom trays to the top and vice-versa) every few hours to promote even drying.
Step 4: How to Know When Your Fruit is Perfectly Dried
The key is to test a piece after it has cooled completely. A properly dried fruit should feel leathery and pliable, with no soft spots or visible moisture when torn in half. Berries will be harder, and bananas or apples can be dried further until they are crisp like chips if desired.
What Are the Critical Post-Drying Steps? (Cooling & Conditioning)
A food preservation expert would stress that the process is not finished when you turn off the dehydrator. Two final steps—cooling and conditioning—are essential for safety and quality.
Step 1: Cooling Completely
Let the dried fruit cool completely to room temperature on the trays for at least 30-60 minutes. Never package warm fruit, as this will trap steam, create condensation, and lead to mold.
Step 2: Conditioning (The Mandatory Safety Step)
Conditioning is the process of equalizing the residual moisture in your homemade dried fruit.
- Pack the cooled fruit loosely in large, sealed glass jars, filling them about two-thirds full.
- Store the jars in a visible, cool, dry place for 7 to 10 days.
- Shake the jars once a day to separate the pieces and redistribute moisture.
- Check for condensation: Check jars for condensation during conditioning. If moisture appears, return the fruit to the dehydrator. If mold is visible, discard the entire batch.
Once successfully conditioned, the fruit is safe for long-term storage.
How Do You Make Fruit Leathers in a Dehydrator?
A food dehydrator is the perfect tool for making healthy, homemade fruit leathers or roll-ups without the added sugars and artificial ingredients found in store-bought versions. This distinction is important, as we explore in our guide asking, Are all dried versions of fruits considered “dry fruits”?
A food preservation blogger would offer this simple base technique:
- Create a Puree: Start with about 2 cups of fresh or thawed frozen fruit. You can lightly cook fruits like apples to soften them first. Blend the fruit into a smooth, thick puree. You can add a teaspoon of lemon juice to prevent browning. Ripe fruits are naturally sweet, so extra sweeteners are typically unnecessary unless you prefer a sweeter result.
- Prepare Trays: Line your dehydrator trays with parchment paper or the special solid fruit leather sheets that come with many models.
- Spread the Puree: Pour the puree onto the prepared trays and spread it evenly with a spatula to about 1/4-inch (~6mm) thickness.
- Dehydrate: Dry at 140°F (60°C) for 6-10 hours, or until the center is no longer sticky to the touch.
- Cool and Store: Let the leather cool completely, then peel it from the sheet, roll it up in plastic wrap or parchment paper, and store it in an airtight container.
How Do You Clean and Maintain Your Food Dehydrator?
To clean your dehydrator, wash trays with warm, soapy water or place them on the top rack of your dishwasher. Wipe down the base with a damp cloth.
Most dehydrator trays and liners are top-rack dishwasher safe, but always check your manufacturer’s manual. Hand wash them in warm, soapy water. Use a soft brush to remove any stuck-on food. Wipe down the base and lid with a damp cloth. Ensure every component is completely dry before storing it to prevent any mold or mildew growth.
Frequently Asked Questions about Using a Food Dehydrator
What is the best temperature to dehydrate fruit?
The generally recommended temperature for drying most fruits is between 135°F and 140°F (57°C to 60°C). This provides a good balance of safety and efficiency without cooking the fruit.
Why do I have to rotate the trays on my dehydrator?
In many stackable models, the trays closest to the fan and heating element (usually at the bottom) get more direct airflow and will dry faster. Rotating the trays ensures all the fruit dries evenly.
How long will my homemade dried fruit last?
Properly dried and conditioned fruit stored in airtight containers can last 6 to 12 months. For a more detailed estimate based on your specific fruit and storage method, use our Shelf Life Estimator.
Can I dehydrate different fruits at the same time?
Yes, you can dry different fruits at the same time as long as they require the same drying temperature. Be aware that their drying times will vary, so you will need to check them and remove each type of fruit as it becomes done.
My dried fruit is sticky. What did I do wrong?
Stickiness can be due to a few factors. It could be under-dried, meaning there is still too much moisture. It could also be due to high sugar content in the fruit, or high ambient humidity. Ensure the fruit is fully dry and store it in an airtight container.
How we reviewed this article:
▼This article was reviewed for accuracy and updated to reflect the latest scientific findings. Our content is periodically revised to ensure it remains a reliable, evidence-based resource.
- Current Version 16/07/2025Written By Team DFDEdited By Deepak YadavFact Checked By Himani (Institute for Integrative Nutrition(IIN), NY)Copy Edited By Copy Editors
Our mission is to demystify the complex world of nutritional science. We are dedicated to providing clear, objective, and evidence-based information on dry fruits and healthy living, grounded in rigorous research. We believe that by empowering our readers with trustworthy knowledge, we can help them build healthier, more informed lifestyles.